
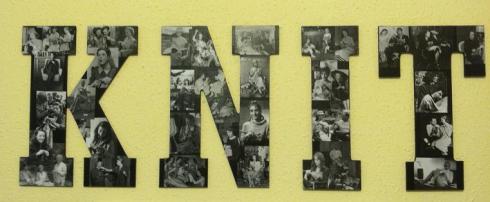
I’m obsessed with pinterest.com! I can spend hours on this site if I don’t limit myself. I’ve found numerous ideas for my craft room via this site and sometimes I get inspired to twist an idea into my own, which is what happened in this case. I had seen a great idea, were someone took family photos and decoupaged them onto a large wooden letter. So of course, I pinned it! Then a few weeks later, while playing around on the internet, I came across some old vintage photos of famous people knitting. I love anything vintage and being a knitter, I fell in love with all the cute photos. Some of the famous people include: Grace Kelly, Katherine Hepburn, Audrey Hepburn, Mrs. Hoover, Mrs. Coolidge, Doris Day, Marilyn Manroe, and Goldie Hawn…. just to name a few. I was thinking, I wish I could make copies of these and do something with them… perhaps frame them and hang them in my craft room. However, I have very little wall space in my small room, so then the idea came to me. Why not print them in black and white on the laser printer, cut them out and decoupage them on to letters to spell the word “knit”? I couldn’t wait to get started, so I started searching Michael’s and Hobby Lobby to see who had the best letters. I decided that I like the letters at Hobby Lobby better, because they were big enough for the pictures to show up. So, I had to go to three Hobby Lobby’s before I could find the letter “K” because that seemed to be a popular letter. But I found it and was soon on my way to making my letters.
Materials Needed:
Desired letters to spell the word of your choice
Your favorite pictures
Computer and plain white paper for printing
Black acrylic paint
Mod Podge (Matte finish)
Sponge brushes
scissors
Directions:
1. Decide on what pictures you would like to use for your letters.
2. Print them out. You might need to play with the size of your pictures, to get the correct size needed for your letters. Also, if you want to do the black and white letters, you might need to use a photo program to change the pictures to black and white if they are in color.
3. Paint your letters black and allow to dry over night.
4. Cut out your pictures.
5. Lay them onto the letters in the places you will want them. This step might take some time. I rearranged my pictures a number of times until I found a way that I liked them.
6. Move the pictures off the letters, placing them on the table in the same fashion that you will want them on the letters.
7. Paint an even, thin coat of Mod Podge onto the letter (do one letter at a time).
8. Flip the first picture over, using a sponge brush, paint a thin layer of Mod Podge onto the back, brushing from the center of the picture to the outer edges.
9. Flip the picture back over and place it on the letter, smoothing it down from the center out to the edges.
10. Repeat steps 8 & 9 until all pictures have been glued to the letter.
11. Alow letter to dry for 3-4 hours.
12. With a clean sponge brush, paint a thin later of Mod Podge over your entire letter to seal the edges of the pictures. I like to brush vertically, then horizontal
13. Allow to dry 3-4 hours, then repeat step 12 once more, so that you have two coats of Mod Podge on top of your pictures.
I hope that if you are interested in creating your own letters that my directions will be helpful to you.
Happy crafting!
~Kim
